Uploading
You register samples from an Excel workbook, then attach data files and protocols to them. Both upload pages need a sign-in.
Where to upload
Open the sidebar and use Data Entry, or the + New sample button.
| Page | Sidebar label | Address | Use it to |
|---|---|---|---|
| Sample metadata | Assay Sheet Upload | /seek/samples/upload/ |
Register or update samples from a workbook |
| Files | Data & Protocol Upload | /seek/data/upload/ |
Attach data files and protocols (SOPs) |
Note
The sample upload page is built for a laptop or desktop. On a phone it shows a desktop-only notice.
The Templates page gives you a workbook that lists every column of the sample types you pick, and Projects and templates explains it. The upload page does not read that workbook yet: use it as the guide to the columns, and upload one of the two shapes below.
The workbook
NExtSEEK reads the sheet names and works out which of two shapes you used. You do not pick a format.
4-sheet workbook
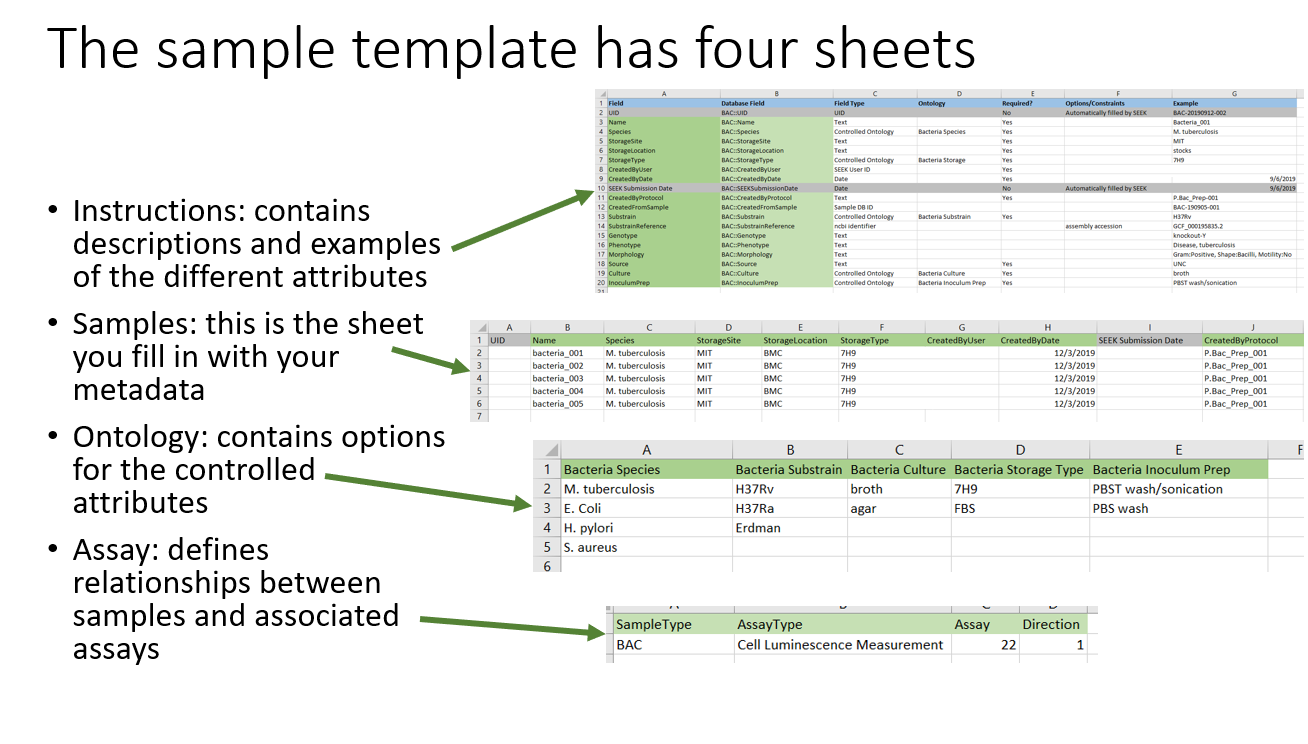
Made for filling in by hand. It describes one sample type and has four sheets.
| Sheet | What it holds |
|---|---|
| Instructions | One row per attribute. Required columns: Field, Database Field, Field Type, Ontology |
| Samples | One row per sample, one column per attribute. Column headers must match the Field values |
| Ontology | Lists of allowed values, one column per list |
| Assay | Which assays the samples belong to. Required columns: SampleType, AssayType, Assay, Direction |
On the Instructions sheet:
- Database Field is written
SAMPLETYPE::AttributeName, for exampleTIS::Type. The attribute name must match the database exactly. - Field Type is Text, Number, Date or Controlled Ontology.
- Ontology names the list on the Ontology sheet. It is used when the field type is Controlled Ontology.
A sample's Name and its primary data file name must be unique within a sample type.
Flat workbook
One Samples sheet with the columns uid, sampletype, json_metadata and assay_ids. The optional columns are project_id, study_title and assay_titles. The metadata goes into json_metadata as JSON, so one sheet can carry many sample types.
UIDs
Leave uid blank on a first upload. NExtSEEK makes the UID for you. Fill it in only to point at a sample that already exists.
To load several sample types at once, use one flat sheet, or select several 4-sheet files in the same upload. They run as one job.
Validate first
Check a sheet before you commit it. Nothing is written.
- In the Sample Validation Check box, choose the sheet.
- Pick a project.
- Click Validate Samples.
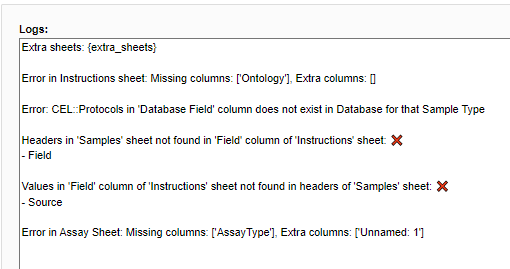
The log shows PASSED or FAILED, the row counts, and the errors. Errors are grouped by problem, so fifty rows with the same mistake appear once, with their row numbers. Warnings follow.
What the check covers:
- The workbook shape is recognized, and for a 4-sheet file all four sheets and their required columns are there.
- Every Samples column is listed under Field on the Instructions sheet.
- Every Database Field is a real attribute of that sample type.
- Controlled values are in their list.
Some findings stop the upload, such as a missing sheet or column. Others are warnings. A Samples column that Instructions does not declare is dropped, so those samples load without that attribute.
Note
The page runs the structure check. The name check (finds duplicates and rows that would update an existing sample) and the dependency check (finds parent and child loops) are available through the validate API only.
Upload samples
- Prepare the sheet or sheets.
- Validate and fix what it reports.
- In Sample Excel sheet for uploading, choose the file or files and a Project. Only
.xlsxfiles are accepted. - Admins can pick the Lab and Creator to upload for. Everyone else leaves the defaults and uploads as themselves.
- Keep Update existing? (otherwise skipped) checked if some rows carry UIDs you want to change.
- Click Upload Samples.
The upload runs as a background job. The Logs box shows its status. When the job ends, a summary CSV downloads on its own. It lists what happened to every row, including the UIDs that were made. Paste those UIDs back into your sheet if you will update the samples later.
Then check the result: confirm the number of samples, spot-check a few, and make sure their attributes are present. You can find them in Sample Search.
What the job does
Parents go in before their children, so a sheet can describe a whole lineage at once.
| Stage | What happens |
|---|---|
| Convert | Detect the format, merge files, check controlled values |
| Name check | Match rows against existing samples |
| UIDs | Make UIDs for blank rows |
| Order | Read parent and child references and put parents first |
| Insert | Write the samples |
| Graph | Copy the new samples into the sample graph, see Graph search |
| Report | Build the summary CSV |
The job saves its place as it goes, so an interruption can resume.
Update existing samples
To change samples that already exist, upload a sheet whose rows carry their UIDs, with Update existing? checked. With it unchecked, a row whose UID already exists is skipped.
- Fields you include are overwritten. Fields you leave out stay as they are. Send only what you want to change.
- Assay links are replaced, not merged. A sample ends up linked to exactly the assays on the sheet. List the assays again to keep them.
Upload files and protocols
Open Data & Protocol Upload.
- Choose the files.
- Set Type to SOP (a protocol) or Data File.
- Choose a Project. Admins can also choose the Lab and Creator.
- Click Upload Files.
The Logs box reports each file.
A protocol needs nothing more. Its title is built as P.<LAB>-<YYMMDD>-V1_<file name>.
Each file becomes its own data file record in the project you chose. Upload it under the file name its sample records in File_PrimaryData, so the file and the sample can be matched.